If you want a client, coworker, student, hiring manager, customer, or friend to open your Notion page without creating a Notion account, the key is simple: don’t invite them privately by email. Instead, make the page available through a public link or publish it as a Notion Site. In Notion’s current sharing model, an invited guest needs a Notion account, while a page set to Anyone on the web with link can be viewed by people who are not part of your workspace and are not Notion users. Viewers only need to log in to comment on or edit the page. Check out the Best info about share notion page without account.
That distinction matters. Many people search for how to share a Notion page with someone without account because they copy a page URL, send it, and the recipient sees an access error or login screen. Copying a link is not the same as granting access. To make the page truly accessible with no account required, you must change the page’s sharing or publishing settings first.
Below is a clear, practical guide to help you share Notion page without account access issues, choose the right permission settings, embed a public page, protect private information, and fix the most common sharing problems.
The quick answer
To share a Notion page publicly so someone can view it without a Notion account:
- Open the Notion page you want to share.
- Click Share at the top of the page.
- Under General access, choose Anyone on the web with link.
- Set the permission level to Can view unless you have a specific reason to allow commenting or editing.
- Click the Copy link and send it to your viewer.
- Test the link in an incognito or private browser window before sending it widely.
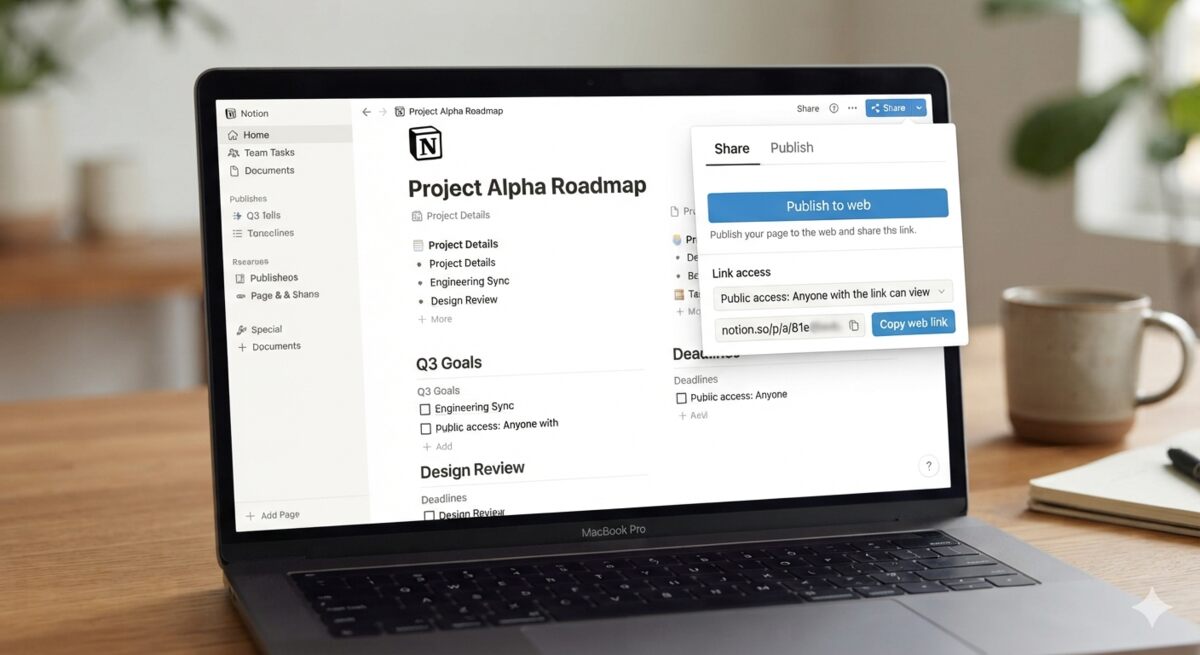
If you want the page to behave more like a public website, use Notion Sites instead: open the page, click Share, go to the Publish tab, and select Publish. Notion states that published Sites are viewable by anyone on the web, and content changes to the published page update automatically on the live Site.
Public sharing vs. private sharing in Notion
Before you click anything, understand the three main ways Notion access works. This will save you from the classic “Why is Notion asking them to log in?” headache.
Private invite
A private invite is when you add someone by email. This is useful when you need identity-based access, collaboration, or tighter control over who can view the page. However, Notion’s help documentation says that a guest invited to a page needs their own Notion account to access it. So if your goal is to share a Notion page with someone who doesn’t have an account, this usually isn’t the path you want.
Use a private invite when:
- The page contains confidential information.
- You need to know exactly who accessed the page.
- The recipient is willing to create or use a Notion account.
- You want to give specific permissions to one person or one group.
Avoid a private invite when:
- The viewer refuses to create an account.
- You are sharing a public resource, portfolio, FAQ, syllabus, event page, lead magnet, or read-only document.
- You want fast access from any browser.
General access: anyone on the web with link
This option makes the page accessible to anyone who has the link, including people outside your workspace and people who are not Notion users. It is often the fastest way to share notion page without account friction. Notion also lets you choose whether people with the public link can view, comment, or edit, and it supports setting link expiration for this general access link.
Use this option when:
- You want to send a direct link to a page.
- You do not necessarily want the page to be discoverable through search engines.
- You need quick, lightweight public viewing.
- You are sharing a draft, a resource page, a checklist, a proposal, an agenda, or a documentation page.
Remember: “anyone with the link” means exactly that. If the link is forwarded, the next person can open it too. Treat it as public, not private.
Publish as a Notion Site
Publishing creates a public Notion Site from your page. This is better when you want your content to function like a webpage, portfolio, landing page, knowledge base, public roadmap, help center, resume, or resource hub. To publish, follow Notion’s instructions: open the page, select Share, then open the Publish tab and select Publish.
Use Notion Sites when:
- You want a cleaner public web experience.
- You want to share a live page publicly and potentially make it discoverable.
- You want to embed the published page on another website.
- You may want public site settings such as search indexing, duplication controls, or site customization.
Notion makes a specific distinction between publishing a page as a Notion Site and using the Anyone on the web with link general access setting. These features overlap in that both can make content public, but they are managed in different areas and can affect access differently.
Step-by-step: share a Notion page with no account required
This is the simplest method when you want someone to open a Notion page in a browser and read it without signing in.
Step 1: Prepare the page before sharing
Start by reviewing the page as if you were a stranger. Look for names, private notes, internal comments, hidden sections, client details, pricing, personal data, draft strategy, or anything that should not leave your workspace.
Pay special attention to:
- Subpages listed inside the page.
- Database views embedded inside the page.
- Linked pages, synced blocks, and attachments.
- Internal meeting notes or comments copied into the page.
- Personal profile information connected to contributors.
This review matters because Notion notes that when a page is published to the web or set to Anyone on the web with link, the webpage metadata can include names, profile photos, and email addresses associated with Notion users who contributed to the page.
Step 2: Open the Share menu
Open the exact page you want to share. Click Share at the top of the page. The Share menu is where Notion lets you invite people, adjust who has access, change permission levels, copy the page link, and access the Publish tab for web publishing.
Do not copy the browser URL yet. A plain page URL only works for people who already have access. If the page is still private, sending the URL will send people straight into an access denied or login experience.
Step 3: Change general access
Inside the Share menu, find General access. Open the dropdown and select Anyone on the web with link. Notion defines this setting as allowing anyone with the page link to access it, even if they are not part of your workspace and are not a Notion user.
This is the most direct answer to “Can I share a Notion page without account requirements?” Yes, for viewing, use this public link setting.
Step 4: Choose the right permission level
After selecting Anyone on the web with link, open the dropdown next to that access setting and choose the permission level.
For most public pages, choose:
- Can view
Only consider broader permissions if you truly need them:
- Can comment if you want feedback, but remember that visitors need to be logged in to Notion to comment.
- Can edit if you want public collaboration, but remember that visitors need to be logged in to Notion to edit.
- Higher access levels should be avoided for public links unless you fully understand the risk.
Notion’s permission options include levels such as Full access, Can edit, Can comment, and Can view, and It explains that visitors need to be logged in to Notion to comment on or edit a page.
The safest public default is view-only. Think of it as putting your page behind glass: easy to read, hard to damage.
Step 5: Set an expiration date if the page is temporary
If the public link is only needed for a short period, use the link expiration setting. Notion says you can open the dropdown next to Anyone on the web with link, open the dropdown next to Link expires, and choose a time or date.
This is useful for:
- Temporary client reviews.
- Event schedules.
- Class materials for a specific week.
- Vendor onboarding pages.
- Job candidate exercises.
- Limited-time resource access.
Link expiration is not a substitute for a privacy review, but it is a helpful safety net.
Step 6: Copy and send the link
Once general access is set correctly, click Copy link. Then send the link by email, Slack, text, calendar invite, website button, QR code, or wherever your audience expects to find it.
For a polished message, write something like:
Here’s the Notion page. You should be able to view it in your browser without creating a Notion account.
If the recipient only needs to read the page, mention that explicitly:
This is view-only, so no login is required to read it.
That small sentence reduces confusion and prevents people from clicking comment or edit actions and assuming the page is broken when Notion asks them to sign in.
Step 7: Test the link like a viewer
Before sending your link to a large audience, test it in a private browsing window or a browser where you are not logged into Notion. This confirms that the page opens as a non-Notion user would experience it.
Check for:
- Whether the page opens without logging in.
- Whether any blocks show “No access.”
- Whether images and files load.
- Whether subpages open as expected.
- Whether the page looks good on mobile.
- Whether the permission is truly view-only.
Testing is the difference between “I shared it” and “they can actually use it.”
Step-by-step: publish a Notion page as a public website
If you want your page to feel more like a public website than a shared document, use Notion Sites.
Step 1: Choose the page you want to publish
Open the page that should become public. Treat this page as the homepage of your public experience. If the page includes links to subpages, menus, databases, or resources, review them before publishing.
Notion warns that publishing a page to the web means its subpages will be published too, so you should make sure subpages are ready before publishing.
Step 2: Open Share, then Publish
Click Share at the top of the page. Open the Publish tab. Select Publish. Notion’s help documentation describes this as the core workflow for publishing a Notion Site.
After publishing, select View site to see the live page. This gives you the same perspective your visitors will have.
Step 3: Copy the public Site link
After publishing, go back to Share → Publish and copy the live Notion Site link from there. This matters because the published Site link is different from the internal Notion workspace URL. Notion specifically warns that if people land on a “Continue to external site” message, you may have shared the workspace version of the page rather than the published page link.
A good rule: if you are sharing a published Notion Site, copy the link from the Publish tab, not from your browser bar inside the Notion app.
Step 4: Adjust search engine settings
If you want the page to be discoverable in search engines, look for search engine indexing settings in the publish controls. Notion says you can select Search engine indexing and toggle on Discoverable on the web to make the Site searchable, and it notes that Notion Sites can take up to four weeks to be indexed and appear in search results.
If you do not want search visibility, leave search indexing off. The page can still be accessible to people with the link, but you are not asking search engines to list it.
Important nuance: turning off search indexing does not make a public page private. It simply reduces discoverability. Anyone with the link may still be able to open it.
Step 5: Decide whether visitors can duplicate it
If your public page is a template, checklist, planner, tracker, or resource you want people to copy, duplication can be useful. If you do not want people copying the page into their own workspace, turn duplication off.
Notion says public pages can be duplicated into a viewer’s workspace, and page owners can prevent duplication by opening Share → Publish → Site customization, selecting Header, toggling off Duplicate as template, and publishing changes.
For client portals, internal-facing public docs, or paid resources, review this setting carefully.
Step 6: Keep editing in Notion
One of the best parts of publishing a Notion Site is that your Notion page remains the source of truth. Notion says that as you make content changes in a published Notion page, the Site updates automatically.
That makes Notion convenient for living documents such as:
- Public roadmaps.
- FAQs.
- Help centers.
- Class syllabi.
- Event schedules.
- Product documentation.
- Team handbooks.
- Portfolios and resumes.
- Community resource hubs.
Still, make edits thoughtfully. If the page is public, your updates are public too.
Which method should you use?
Use Anyone on the web with link when you want quick link-based access. This is ideal for sharing one page with a specific audience where no account required viewing is the priority.
Use Notion Sites when you want a more website-like experience, public presentation, optional search visibility, embedding, domain management, or site customization.
A simple way to decide:
- If you are sending a page to one person or a small group, use Anyone on the web with link.
- If you are publishing a resource for a larger audience, use Notion Sites.
- If the page contains sensitive information, do not use either public option unless you have removed the sensitive content.
- If you need private access for named individuals, invite them directly, but expect them to use a Notion account.
Permission settings explained in plain English
Notion permissions are powerful, but they can feel slippery until you translate them into real-world outcomes.
Only people invited
This keeps the page private to you and the specific people you invite. It is the best option for confidential work. It is not the best option for viewing without an account, as invited guests need a Notion account.
Everyone at your workspace
This makes the page available to members of your workspace. It is useful for internal docs, team resources, policies, and shared operating procedures. It does not help outside viewers unless they are part of your workspace. Notion’s help docs describe workspace-level sharing as a way to grant access to everyone in a workspace and assign a specific access level such as view-only.
Anyone on the web with link
This is the setting most people need when they ask how to share a Notion page publicly. Anyone with the link can access the page, including non-Notion users. Use Can view if the page is meant to be read.
Can view
The viewer can read the page. For public sharing, this is usually the right choice.
Can comment
The viewer can leave comments, but Notion says visitors must be logged into Notion to comment. This means it is not truly a no-account action, even if viewing is no-account.
Can edit
The viewer can modify content, but Notion says visitors must be logged in to edit. Use this carefully, especially with public links.
Full access
Full access gives broad control, including editing and sharing capabilities. Notion describes full access as allowing people to edit page content and share the page with anyone they want. This is rarely appropriate for a public link.
How to embed a public Notion page on another website
Embedding is useful when you want a Notion-powered resource to appear inside another website, landing page, help center, course portal, or internal portal.
For a published Notion page, Notion provides an embedding workflow: click Embed this page, choose Copy this code, optionally toggle Show page title, and paste the code into your website’s HTML or a code block in your website builder.
Use embedding for:
- Public FAQs.
- Documentation snippets.
- Event agendas.
- Product changelogs.
- Resource directories.
- Public forms, charts, or databases.
- Simple client-facing pages.
Before embedding, confirm the page is meant to be public. An embedded page is not a privacy shield. If the source page is public, assume the embedded content is public too.
Embedding best practices
For a clean embedded experience:
- Publish the page first. Use the public Site version, not a private app URL.
- Keep the embedded page focused. A short, specific page usually embeds better than a huge workspace-style document.
- Test on mobile. Embedded content can feel cramped on small screens.
- Use clear headings. Visitors need context when a Notion page appears inside another site.
- Avoid sensitive databases. If a database view is not meant for everyone, do not embed it publicly.
- Test while logged out. If the embed only works when you are logged in, your audience may not see it correctly.
Privacy and security best practices
Public sharing is convenient. It is also unforgiving. Before you send a link, use this safety checklist.
1. Assume a public link can travel
When you use Anyone on the web with link, anyone with the link can access the page. Even if you only send it to one person, that person can forward it, paste it into a chat, bookmark it, or share it elsewhere. Notion defines this setting as access for anyone who has the link, including people outside the workspace and non-Notion users.
Do not put secrets behind an “unlisted” link.
2. Use view-only access by default
For most public pages, Can view is the correct permission. Commenting and editing create more risk, and Notion requires viewers to be logged in for those actions anyway.
Use edit access only for controlled collaboration, not broad public sharing.
3. Audit subpages before publishing
If you publish a page as a Notion Site, Notion says its subpages are published too. Check every child page before publishing.
Look for:
- Drafts.
- Private notes.
- Archived project pages.
- Internal-only instructions.
- Hidden client details.
- Old files and attachments.
- Subpages you forgot existed.
A public homepage with one forgotten private subpage can quickly become a privacy problem.
4. Review contributor metadata
Notion notes that public or web-shared pages may include metadata with names, profile photos, and email addresses associated with contributors. If that matters for your use case, consider copying the content into a clean publishing page, reducing contributor exposure, or using another publishing workflow.
This is especially important for agencies, schools, healthcare-adjacent teams, legal teams, and companies with strict privacy rules.
5. Avoid publishing your working version
Create a separate “public copy” of your page when possible. Keep your messy working page private, then copy only the polished content into a publish-ready page.
This helps prevent accidental exposure of:
- Internal notes.
- Draft comments.
- Strategy sections.
- Unapproved copy.
- Private database properties.
- Unfinished subpages.
6. Be careful with databases
Databases can contain more than what a single view shows at first glance. Before sharing a page with database content, open the public link as a visitor and inspect what is visible. Check filters, hidden properties, linked pages, relation fields, and any database items that open as pages.
If the database contains private information, create a filtered public version or a separate database for public use.
7. Use link expiration for temporary access
If a public page is only needed for a deadline, review, event, or short-term collaboration, set an expiration date for the public link. Notion supports link expiration for the Anyone on the web with link setting.
This is especially helpful for:
- Proposals.
- Candidate assignments.
- Project previews.
- Temporary onboarding.
- Review packets.
8. Keep an inventory of public pages
Notion lets workspace members go to Settings → Public pages to see and manage public pages, including published Sites, public forms, and pages anyone with a link can access. Workspace owners can also manage publishing restrictions from there.
Make it a habit to review public pages regularly. If your workspace has many members, this is not housekeeping. It is governance.
9. Know your workspace restrictions
Enterprise workspace owners can prevent public sharing by going to Settings → Security and enabling Disable publishing sites, forms and public links. If that setting is enabled, members may not be able to publish Sites or create public links.
If you do not see public sharing options, your workspace settings may be the reason.
10. Do not rely on password protection
Notion’s public Site documentation says password protection is not supported at the moment. If you need restricted access, use private sharing with named people who can log into Notion, or choose a different publishing method that supports passwords.
Troubleshooting public Notion sharing
When Notion sharing goes wrong, the cause is usually one of a few predictable settings. Here is how to quickly diagnose the issue.
Problem: The viewer sees “No access” or “You do not have access”
Likely causes:
- You copied the page URL but did not change General access.
- The page is still set to Only people invited.
- You sent a private workspace link instead of the public Site link.
- A workspace owner has disabled public links.
- The viewer is opening a subpage, database item, or embedded item that is not publicly accessible.
Fix it:
- Open the page in Notion.
- Click Share.
- Under General access, choose Anyone on the web with link.
- Set the permission to Can view.
- Click Copy link again.
- Test in a private browser window.
If you published a Notion Site, copy the public link from Share → Publish. Notion says the correct published link can be found from the Publish tab, and sharing the internal workspace version can send visitors to the wrong experience.
Problem: Notion asks the viewer to log in
This depends on what the viewer is trying to do.
If they are only trying to view the page, a login prompt usually means the page is not actually public or the wrong link was shared. Use Anyone on the web with link or publish the page as a Notion Site, then copy the correct public link.
If they are trying to comment or edit, the login prompt is expected. Notion states that visitors must be logged in to Notion to comment on or edit a shared page.
If they were invited privately by email, they need a Notion account because Notion says guests must have their own account to access invited pages.
Problem: The public page works for you but not for others
You may be seeing the page because you are logged in as the owner. Test the link in an incognito window or a different browser where you are logged out of Notion.
Also check whether you shared:
- The internal Notion app URL.
- The published Notion Site URL.
- A database item URL.
- A subpage URL.
- An expired public link.
If the link has expired, update the expiration settings or create a new public link. Notion supports expiration dates for Anyone on the web with link access.
Problem: The published Site shows a “Continue to external site” message
Notion’s help documentation says this can happen when you share the version of the page from your Notion workspace instead of the published page URL. To fix it, open the published page in Notion, go to Share → Publish, copy the URL shown there, and send that link instead.
Problem: Search engines are not showing the page
First, confirm search engine indexing is turned on. Notion says you can use Search engine indexing and toggle on Discoverable on the web to make a Site searchable. Second, be patient: Notion notes that Sites can take up to four weeks to be indexed and appear in search results.
Also remember that search indexing does not guarantee ranking. A page may be technically indexable without ranking prominently for your target keyword.
Problem: People can edit the page
Go to Share, open the dropdown next to the public access setting, and change the permission to Can view. Notion lets page owners adjust permission levels from the Share menu.
Then review whether specific people, groups, or workspace members also have edit access. Public permissions are not the only permissions that matter.
Problem: A subpage is public when it should not be
If you published a Notion Site, remember that Notion says subpages are published too. Remove the sensitive subpage, move it elsewhere, make a clean public copy, or unpublish the parent page until the structure is safe.
Problem: You cannot find the public sharing option
Your workspace may restrict public sharing. Notion says that Enterprise workspace owners can disable publishing of Sites, forms, and public links in security settings.
If you are not the workspace owner, ask your admin whether public sharing is allowed.
Problem: Your old public links stopped working
If your workspace domain changed, Notion says existing links that start with the previous domain will no longer work, and you need to share the new link. You can find the new public URL by opening the published page and going to Share → Publish.
Problem: The embedded Notion page is blank or blocked
First, make sure you embedded the published page, not a private workspace page. Notion’s embed workflow is tied to published pages: click Embed this page, copy the code, and paste it into your website’s HTML or site-builder code block.
Then test:
- Whether the page opens while logged out.
- Whether the embed code was pasted into the correct block type.
- Whether your site builder allows custom embed code.
- Whether the page height or container styling is hiding the content.
- Whether the content you embedded relies on private blocks or restricted third-party assets.
Best use cases for public Notion pages
Public Notion sharing shines when the page is useful, lightweight, and easy to update. It is not always the right choice for highly designed websites or sensitive portals, but it is excellent for many practical publishing jobs.
Common use cases include:
- Portfolio pages: Share work samples with hiring managers or clients.
- Resume pages: Create a living resume that is easy to update.
- Client resources: Provide onboarding steps, timelines, and deliverables.
- Event pages: Share schedules, speaker details, maps, and FAQs.
- Class pages: Publish syllabi, reading lists, and assignment instructions.
- Public roadmaps: Show what is planned, in progress, and recently shipped.
- Help centers: Create simple documentation or support pages.
- Template galleries: Let visitors duplicate useful systems into their own workspace.
- Community hubs: Share links, guides, norms, and announcements.
- Press kits: Keep logos, bios, company descriptions, and media assets in one place.
For all of these, the same principle applies: public page, public mindset.
A polished sharing checklist
Before sharing your Notion page publicly, run through this checklist:
- The page contains only information intended for public viewing.
- Subpages have been reviewed.
- Database views have been tested from a logged-out browser.
- The public permission is set to Can view unless collaboration is intentional.
- Search engine indexing is off unless you want search discoverability.
- Duplication is off unless you want the page used as a template.
- The correct public link has been copied.
- The link opens without a Notion account.
- The page works on mobile.
- The owner knows how to unpublish or remove public access.
If you do those ten things, you will avoid most Notion sharing mishaps.
How to stop sharing a public Notion page
If you used Anyone on the web with link, open Share, find the dropdown next to Anyone on the web with link, and remove public access. Notion’s documentation says this is how to turn off the general access setting so the page contents are not shared publicly.
If you published a Notion Site, open the page, click Share, go to Publish, and select Unpublish. Notion also notes that unpublishing a Site does not necessarily remove the separate Anyone on the web with link setting, so check both places if you want to make sure the content is no longer public.
That final point is crucial: publishing and general access are separate. If you want a page fully private again, verify both settings.
FAQs
Can someone view my Notion page without a Notion account?
Yes, if the page is set to Anyone on the web with link or published as a Notion Site. Notion says anyone with the link can access a page under that general access setting, even if they are not a Notion user. Viewers need to log in only if they want to comment or edit.
What is the best way to share a Notion page with someone who doesn’t have account access?
Use Share → General access → Anyone on the web with link, then set the permission to Can view and copy the link. If you want a website-style experience, use Share → Publish → Publish to create a Notion Site.
Can I privately share a Notion page with someone who does not have a Notion account?
Not in the same way you can privately invite an account-based guest. Notion says guests invited to a page need their own Notion account. If the viewer cannot use an account, the practical options are a public link, a published Site, or exporting/sending the information in another format.
Is “Anyone on the web with link” the same as public?
Yes, treat it as public. The page may not be promoted by search engines, but anyone with the link can open it. That means forwarded links, shared bookmarks, and pasted URLs can expand the audience beyond the original recipient.
Will my public Notion page appear on Google?
Only if search engine indexing is enabled and search engines index it. Notion says Discoverable on the web can make a Site searchable, and Notion Sites can take up to four weeks to be indexed and appear in search results.
Can I share a Notion page publicly but keep it out of search engines?
Yes, you can share a link publicly without turning on search engine indexing. Just remember that not being indexed is not the same as being private. Anyone with the link may still access the page.
Can I password-protect a public Notion page?
Notion’s public Site documentation says password protection is not supported at the moment. If you need restricted access, use private sharing with people who can log into Notion or use another tool that supports password-protected pages.
Can I make a public Notion link expire?
Yes. Notion says you can open the dropdown next to Anyone on the web with link, then use Link expires to choose a time or date.
Can public viewers edit my Notion page without an account?
No. Public viewers can view pages without an account, but Notion says visitors need to be logged in to Notion to comment on or edit a page.
Can I let people duplicate my public Notion page?
Yes, if duplication is enabled. Notion says public pages can be duplicated into a viewer’s workspace, and page owners can turn off Duplicate as template in the published page’s site customization settings.
Do subpages become public too?
For Notion Sites, yes. Notion warns that publishing a Notion page to the web means all of its subpages are published too. Review subpages before publishing.
How do I remove public access later?
For a public link, remove Anyone on the web with link from the Share menu. For a Notion Site, go to Share → Publish and select Unpublish. Check both settings because Notion says a page may still have public general access even after the Site is unpublished.
Why does my viewer still see a login prompt?
They may be using a private invite, trying to comment or edit, opening an internal workspace link, or accessing a page that was never made public. For no-account viewing, use a public link or a published Notion Site and test it while logged out.
Final guidance
If the page is safe to be public and the viewer only needs to read it, the cleanest route is Anyone on the web with link plus Can view. That gives you a fast, simple, no account required sharing experience.
If the page is meant to act like a public website, publish it as a Notion Site, copy the public Site URL from the Publish tab, and review search indexing, duplication, embedding, and subpages before sending it out.
The golden rule is this: share the minimum access needed for the job. Public Notion pages are wonderfully useful when they are intentional, clean, and tested. Set the right permission, copy the right link, open it while logged out, and your viewers should be able to access the page without the dreaded login wall.